Thursday, November 29, 2012

{Insta-lately}

I've got nothing new planned to post right now but I wanted to check in and say hi! If you follow me on Instagram you might know that my husband and I are in the process of buying a house here in Texas (yay) so the past couple weeks have been filled with house hunting, offers and counter offers, Thanksgiving, stocking making, home inspections, quilt finishing, baby raising, house keeping (minimal house keeping. Minimal.), holiday decorating, Christmas shopping, travel planning... Etc. etc. etc. so little time for blogging. I recently saw a fellow blogger with blogposts and plans scheduled and written out on her to-do list and another with like 10 pre-written posts ready to go for future dates. This is where I would love to be with my blogging. That would just be such a wonderful place. I'm really going to aim for better organization in 2013. Maybe it will start with our new home. We are outgrowing our apartment so maybe our new house will have a nice place for everything. I'm getting the chance to clean out, de-clutter, simplify and start fresh and I'm hoping its the jump start I need to work on my organization and schedule. (Motivation too maybe?) I'm only getting this chance one more time (hopefully) so I don't want to mess it up. It's also the opportunity to pick some fabulous paint colors and new furniture pieces to make our new house cozy and that's really exciting! Any local DFW readers have any fab furniture/decorating places they like to shop? Any non local readers have favorite online decorating sites? Shops? What's your very favorite paint color? Favorite rug? Design blog? Budget friendly design/DIY ideas? Pins? Start throwing out some ideas for me! I'm not wasting this chance to explore my options and really make our future home perfect for our family. I have every intention of sharing our progress in my new organized life ;) here on my blog as well. (Throwing that out there so maybe ill be held accountable... ) Thanks for the help! Here are some recent Instagram images for you because I don't want to leave this post picture-less. xoxo


Friday, November 9, 2012

{Paper Box Quilt Co. Stockings!}

Stocking Family

I'm not sure if you know this, but the holidays are coming.  FAST!  Thanksgiving is in about 2 weeks and then Christmas is practically like a couple days later.  I don't know about you, but I am THRILLED about the thought of getting my decorations out!

So, lets get ready!  I am making stockings.  Custom stockings actually, any color you want because, lets be serious, all colors are festive when there are twinkle lights involved.  (and adding turquoise makes everything awesome, don't you think?)  Listings are up in my shop so go get them!  And hurry because there's a limited quantity and only like a day until Christmas! ;)

Stocking Family

Patchwork

Patchwork

Pinwheel

Pinwheel

Chevron

Chevron

Yippie,... Holiday decorating! :)

Tuesday, October 23, 2012

{Pillow Talk Swap}

PTS9 Pillow Cover SENT
I was able to get into the Pillow Talk Swap for round 9, going on right now.  I made the pillow above for my partner using the spiderweb block tutorial over at Sew Mama Sew.  It was SO easy and I really enjoyed learning & making a new block.  I hope my swap partner loves it!!

Are any of my readers participating in the PTS9 swap??

Friday, October 19, 2012

{Star Ornament Tutorial}


First, thanks to everyone that entered my little giveaway!  I am hoping to get a few sets of coasters made up for the shop, so stay tuned if you were wanting to get one but didn't win.

Second, I have received some fabulous 
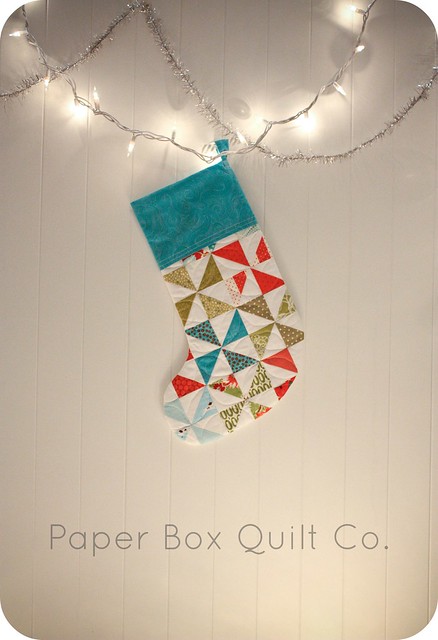
Instagram feedback on an ornament that I made recently and several requests for a tutorial.  So,... without further ado, my very first TUTORIAL!  I would like to start of by saying that I did, in fact, find the idea for this fabric star ornament on Pinterest.  However, when I clicked through to find the tutorial it was in another language.  I relied on the pictures to put the star together, but it was a bit of a challenge.  SO, I'm putting together something for all my English speaking friends to try out too.  (here is the original tutorial)
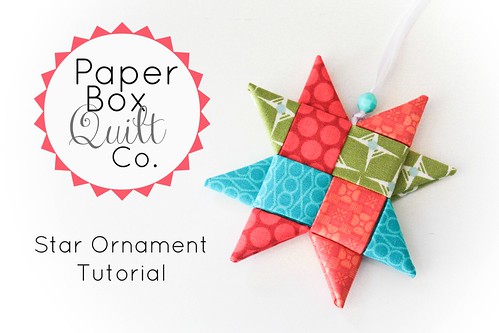

Ornament Tutorial
You will need:


- (4) strips of fabric, measuring 3.5" x 12"
- Fabric Glue
- A large eye tapestry needle
-12"-15" of 1/8' ribbon
- Beads (optional)

Ornament 1
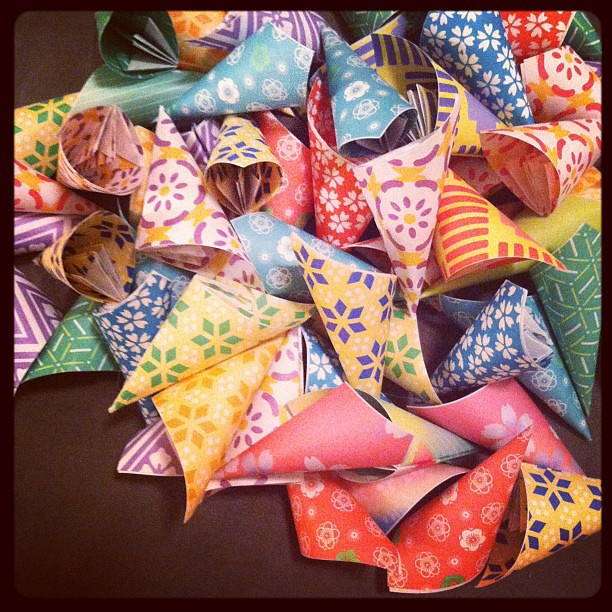
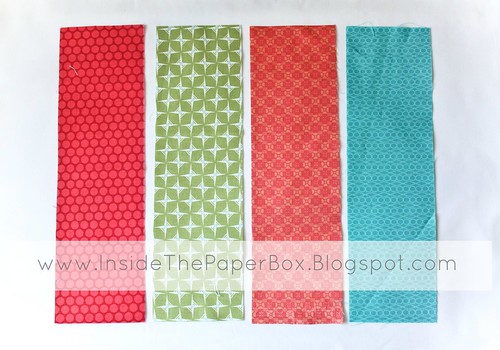
Start with choosing your four prints.  Cut them to measure 3.5"x12".

Ornament 2

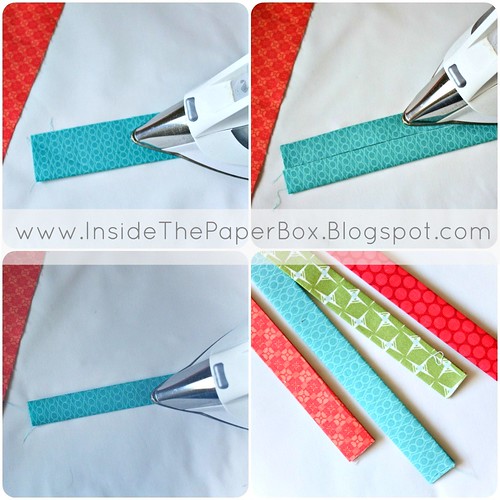
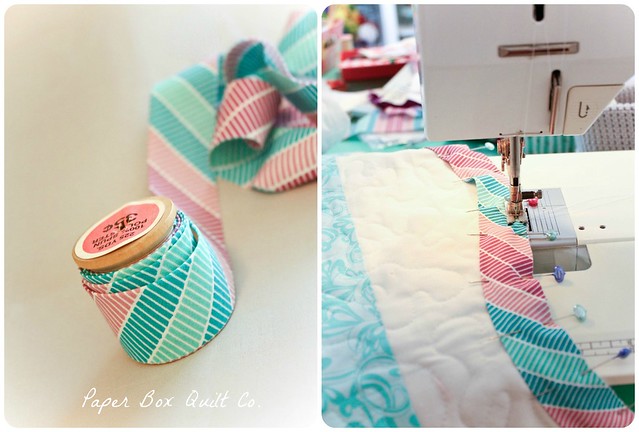
Iron all your pieces in half to crease.  Then iron each side into the center to meet at your crease.  Fold in half and iron again to get a nice, smooth strip measuring approximately 7/8"x12".  (this is essentially a double fold binding strip)


Ornament 3

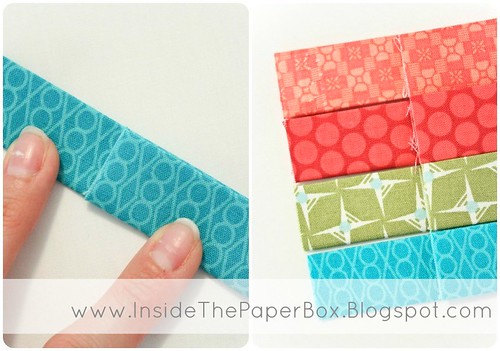
Another little bit of ironing, fold your strip lengthwise so that the top half of your strip is about 2" shorter that the bottom half and iron to crease.


Ornament 4
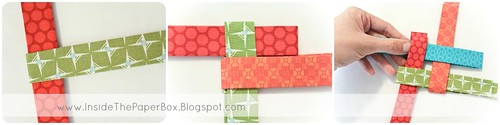
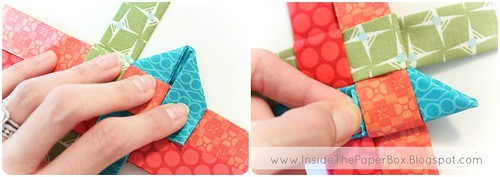
Let's weave our pieces together.  With your short ends facing UP, overlap each piece one at a time as shown in the pictures above.  For your last piece, overlap the previous piece you added, then slip both ends through your first strip as shown in the last picture above.

Ornament 5

Wiggle, pull and tighten your fabric strips until your piece looks like the picture above.


Ornament 6
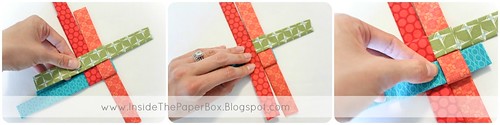
Turn your piece over so the long ends are now on top.  Starting in one corner, fold your strip over your piece (image 1).  Move along to the next strip and fold over (image 2).  Continue with the 3rd piece.  On your fourth piece, pull it through the fold you created with your first strip fold (image 3).

Ornament 7

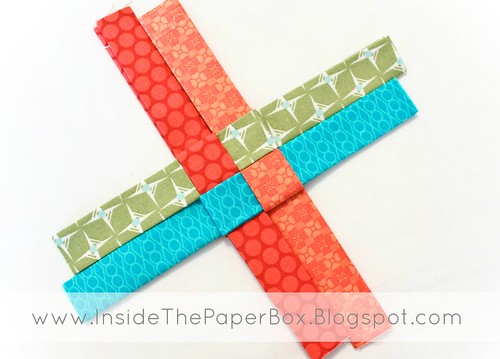
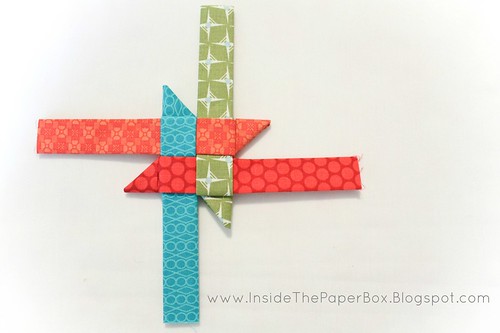
You should have a woven piece that looks like this with all your strip ends measuring approximately the same length.


Ornament 8
Making the points: Using one of your strips on the "top" of your piece (you should be able to determine this better when looking at your own piece) fold it to the back at an angle and back to the front at another angle (image 1 above).  Fold your point in half to create your finished point.  You now need to slide the end of your strip into the fold you created as shown above in picture 2.  You will have a tiny bit of excess fabric peeking through in the center, don't worry, we'll fix that later.

Ornament 9
Skip your "back" strip, and continue making points in the same way around the front of your star.  You will create 4 points on this side, every other strip. (above)  Turn your star over and do the exact same thing on that side.  I had to loosen my strips a bit to pull pieces through other pieces, then I just tightened them all back up.

Ornament 10

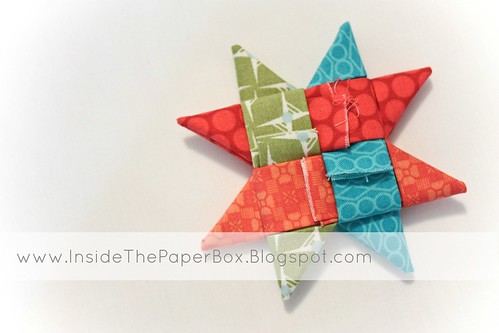
At this point I hope this is all making sense, ;) and, you should have an actual STAR!  Yeah!


Ornament 11

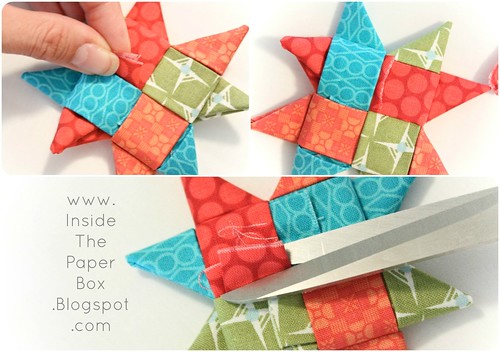
So let's trim up those ugly ends.  Looking at pictures 1 & 2 above, I actually pulled each point further through GENTLY in order to trim the ends enough to hide inside my star.  Be careful not to pull your point all the way out, just enough to trim it up.  Then pull it back to resemble your point, being VERY CAREFUL again, not to pull it all the way out.  Just wiggle it gently until it takes its shape back.  Do this with all the ends that are showing in the center of your star.  

I totally cranked the steam on my iron and ironed the heck out of my star once all my ends were trimmed.  I just wanted a crisp, flat perfectly pointy star.  :)


Ornament Glue
I'm pretty sure the tutorial I used stopped here, but I was kind of worried about my star falling apart after years of use, or that it would take about 3 seconds for my one year old to rip it to shreds.  I decided to make mine a little more durable.  I had this tube of liquid stitch, fabric glue and it worked perfectly.  I put a small bead of glue in as many spaces as I could.  Don't get crazy and squeeze glue all over so it's oozing out of every corner.  Just dab a little wherever you think it will help to keep your star from coming apart.

Ornament needle

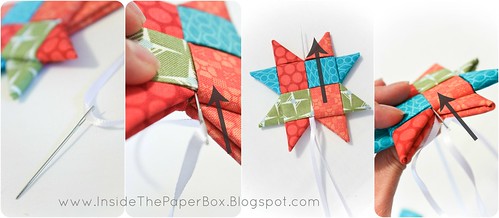
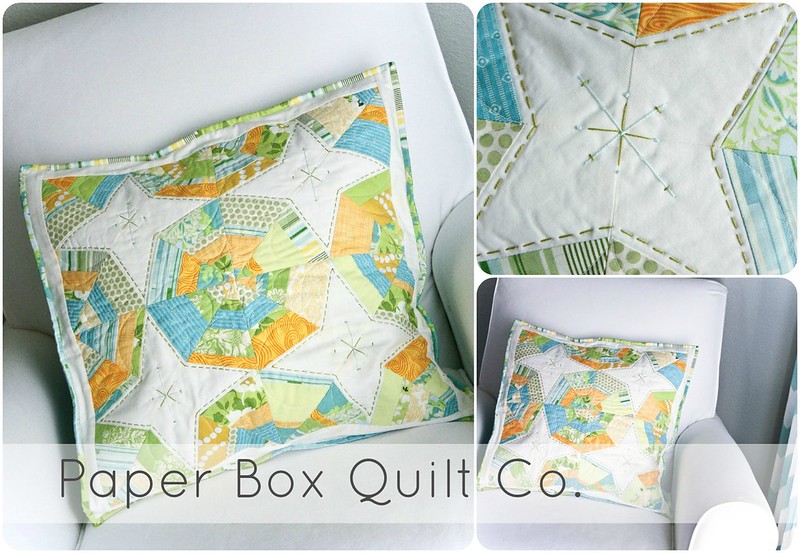
On the original tutorial, she used a nifty punch thing that chopped a hole through all layers of the folded fabric in order to hang your star.  I didn't have that punch thing on hand, so I had to come up with another hanging method.  I used 1/8" satin ribbon and a tapestry needle to thread it down through the top of the star, out the bottom, back up the other side and out the top where you started.  You now have your two ends of ribbon coming out the top.  You can finish it off from here however you like.  I tied a knot, added a decorative bead, tied the ends together and trimmed them up even.


PBQC

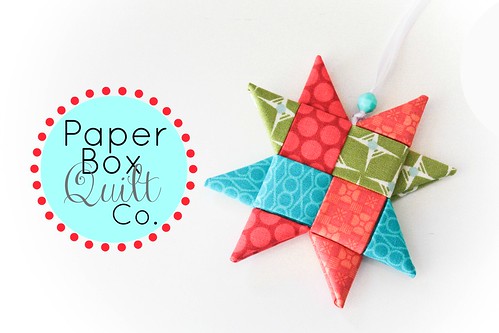
Now, you have this super cute, super easy, super inexpensive star ornament to hand out to all your friends and family this holiday!  My brothers, their wives, me & Tom exchange surprise handmade ornaments so I was testing some for this year and this was one of my favorites.  I plan to tie these to packages, hang some on my windows.  Basically, just put them everywhere because, well, they're just adorable.

Please, please, PLEASE contact me with any questions you may have about putting this together.  I'm not entirely sure all my steps are completely clear and since this is my first tutorial, it may just be all gibberish.  Also, please link me up with your stars or tag me on Instagram (Insidethepaperbox) so I can see what you come up with.

See you soon!  xoxo


Saturday, September 29, 2012

{Giveaway WINNER!!!}

I'll cut right to the chase,... Thanks so much for participating in my giveaway!  So many sweet comments.  According to Random.org, our winner is NUMBER 33...

Picture 1

CHERIE!!

Cherie said:  "And I'm an IG follower :-)"

Congrats Cherie!  Email me your info and I'll get your little coasters in the mail for you.


Cherie

I'll be back soon!

Thursday, September 20, 2012

{Instagram Giveaway}

Put a drink on it Giveaway!
So the other night I reached 200 Instagram followers!  As promised below, I'm hooking up a giveaway to say thanks for your support!  It's been pretty busy around here and sometimes (most times) its easier to keep up to date on Instagram than here on my blog.  I'm going to try to work on that, so don't go anywhere, this giveaway isn't JUST for Instagrammers,... ;)

I have been interested in breaking in to a swap on Flickr but it's not all that easy if you've tried, or if you have in fact been a part of them.  Completely understandable!  I would hate to be stuck with the partner that didn't hold up their end of the bargain, you know?  So, the swap hosts want to see that you have actively participated in a successful swap in your flickr stream.  (keep reading, it will tie back to these coasters,... I think,...) ;)  Anyway, Kelly and I agreed to make table toppers for each other in a private swap so I would have all the evidence I needed to be considered for, maybe the Pillow Talk Swap.  One idea that Kelly threw out was coasters.  Everyone needs a place to put their drink right??  SO along with her table topper, I included a set of four granny square coasters.  They turned out so cute, I'm going to give a set to one of you!

*Please note that the set shown is the set I sent to Kelly :)  Your set will be 4 red/aqua/pink coasters, similar to the one shown in the pictures (which are just not completed yet, but 4 from this picture)*

Granny Coaster Giveaway!

HOW TO ENTER:  Just leave me a comment.  About anything!  You don't have to be an Instagram follower to enter, HOWEVER if you ARE an IG follower of mine, you get an extra entry!  Just leave me a SEPARATE comment telling me you follow me on IG and you'll get two chances to win!  If you're not already following along on IG, then head over, join in the fun, then leave a comment letting me know you are and I'll get you an extra entry too!  I will leave the giveaway open until Friday, Sept 28 when I will announce the lucky winner!  Good luck.

Giveaway!

Finished coasters measure approx. 5.5 inches, are insulated, quilted & bound.  These little beauties will most likely be headed to Paper Box Quilt Co. as well.  I hope you are all having a great week!

xoxo

Tuesday, September 4, 2012

{200 Instagram Followers, a Giveaway & NO DOUBT?!}

When I reach 200 IG followers, I'm gonna do a giveaway. It will definitely involve these cutie mini grannies. Go. Tell your friends.

Soooooo,... I was checking out things on Instagram the other day (what's new??) and realized that I have ALMOST 200 followers!!  (185 to be exact)  That's pretty cool!  Then, I decided that once I reached the 200 mark, I would do a little giveaway and it will definitely involve these tiny little red, aqua and pink granny squares :)  SO,... if you're not already checking out ITPB on Instagram (insidethepaperbox), then head over, follow me and stay tuned for giveaway details!

Shortly after that, I started scheming with a fellow IGer an idea for a potential quilt-a-long.  The RockstarQAL (as it will be referred to from here no on) is where you take inspiration from your favorite band/rockstar/musical artist and create a quilt.  You'll use your inspiration to choose your fabric, prints, colors, pattern, etc.   I want to know if there's any interest in doing this in a formal manner, i.e. sharing progress, starting a flickr group, giveaways, link ups and start/end dates.  Whatdaya think???  Anyone want to get in on this??

Here is my fav band, and the inspiration for my Rockstar quilt:

x No Doubt x
No Doubt - my inspiration for the #RockstarQAL with @renorx

I love these guys!  Many, many years ago, a friend of mine and I went to a concert in Dallas during their Return Of Saturn tour and fell in love!  It was pretty much a dream night, we had backstage passes, met the band, partied with the band, danced with the band, and were invited to drive out to Houston the next day for another concert and another backstage party.  Um YEAH!  What a weekend! Anyway, I will be pulling fabric based on this awesome group to make my quilt.  Who would you choose????

Monday, August 27, 2012

{Fleeting Moments}

These sweet moments don't happen often these days.  This little guy is just too busy playing to stop to snuggle with his mommy!!  BUT I got my moment today and napped with my boy on the couch and it was awesome!  He is just growing so fast, I'll take what I can get!

Untitled

What a great Sunday treat!

xoxo

Monday, August 13, 2012

{A Quilt for Ellie}

Making of Ellie's Quilt

Ellie's Quilt

My tiny niece, Elizabeth Kate was born a liiiiiiiiiitle early,... that over achiever!  She arrived July 18, a full 6 weeks before her due date!!  She is doing great and at home with her mom & dad already!

I guess I was lucky that I started her quilt early enough that all I had to do was trim up the scalloped edge and put the binding on.  I used the Sweet Pea pattern from Camille's book, Simplify.  This is the first quilt I've made from her book but have wanted to make these sweet scallops since I got it!  I LOVED making the binding for this one!

Ellie's Quilt

Welcome to the world little Miss Ellie!!

Also welcome Chi and Izabella, all 3 born within 3 weeks of each other, quilts not shown.

Wednesday, August 8, 2012

{Main Street Days}

PicMonkey Collage 5

So, I took these pictures almost three months ago, but since it's still summer, I'll excuse myself.  There's just something about a street carnival that says summer and I can't help but take a million pictures because those ferris wheels,.... they're just so nostalgic!  This was a carnival/street fair held on "Main Street" where I live.  We ate corn dogs, played crazy carnival games and played with ALL the animals at the petting zoo!  Cash loved every minute of it and was sound asleep by the end of the day!

Carnival Mustache

PicMonkey Collage 6

PicMonkey Collage 4

It's pretty unfortunate that it gets SO hot in the summer here in Texas!  I would love to do more things like this but I don't want to take Cash out on such hot days and I know I don't want to be outside in 100+ degree weather!  :(  I'm hoping for a little rain & some somewhat cooler days coming soon.

What kinds of things do you take your kids to do in the summer?  Any good indoor, inexpensive/free activities for a one year old you can share??


Friday, August 3, 2012

{On Managing Time,...}


July 17. My addiction. #photoadayjuly #fabric 
I'm gonna be honest with you, I am so bad at it!  There are always so many things I want/need to do and pages of lists to remind me and even when I have the time, I still don't seem to get them done.  I'm not just talking about sewing, I mean cleaning, cooking, playing, sewing, showering, blogging, photographing,.... This first year of motherhood has been quite the roller coaster!  It has gone so fast and just when I start to settle into our "routine" that little guy changes,... AGAIN!  He is growing and changing at warp speed and I can not keep up with him!  You would think that I would use the time during his naps to get things like cleaning the bathrooms or making the beds done,... oh no,... not me.  Sleep wins out over everything practically every time,... I'm not going to lie.  I'm a late nighter,... I can NOT get myself to go to bed at a reasonable hour if my life depended on it.  Almost NEVER before midnight (12:02am right now).  Cash gets up at 6:30!!!  What in the world am I thinking??  So, at 8:30, when he's ready for his morning nap, SO AM I!  I go right back to bed and love every minute of it.  Then, we play, eat, go outside (when it's not like a million degrees out) dance, run errands and at 2:00, when he's ready for his afternoon nap, sometimes, I am too.  Now, I don't ALWAYS sleep during this time.  Sometimes I sew, shower,... clean, kinda.  But I still can't seem to focus on what I should really be working on.  I've always been this way.  Always up too late.  Always putting things off. 

In my perfect world, I would have time for everything I want/need to get done.  My house would sparkle, my projects would practically finish themselves, I would ALWAYS get plenty of sleep (and never be tired, ever).  I would be the winner of the mom-of-the-year award.  My WEEKLY blog posts would be interesting and contain real pictures, like the old days.  Oh, and I would be a master chef and still have time to workout too. :)  Wouldn't that be AWESOME!?!?!

Anyway, the point of this is that I want to push myself to "be better".  Basically, for me, this means,.... take on less.  Make my lists shorter, more manageable so I can actually finish them sometimes.  Clean SOMETHING every day (other than the area under Cash's high chair).  Go to bed earlier so sleep won't win during the day.  Take a couple pictures, with my actual camera every day, just a couple, even if they are totally random.  Blog, once a week, about something cool.  Cook (sometimes)  Fix my hair more.  But I'll keep that play/dance time because that's the best part of my day :)

I'm keeping it real,... I'll never be a master chef ;)
Pictures 

I'll see you next week with something cool. :)

(it's now 12:45am btw) ;)

xoxo